Deeper Chain-BSC (BEP20) Bridge Tutorial (PC Version)

This tutorial consists of 3 parts:
1) Metamask wallet extension installation
2) Polkadot JS extension installation
3) BSC/BEP20-Deeper Chain Bridge user’s guide
Please note:
- This tutorial is for PC users only
- This tutorial is for both ETH (ERC20) and Binance Smart Chain (BSC) users
- Users who staked with ERC20 wallets can also use BSC (BEP20) to withdraw their mining rewards
Part I — Metamask Wallet Extension Installation
Recommended browser: Google Chrome or Firefox
- To download Chrome go to: https://www.google.com/chrome/
- To download Firefox go to: https://www.mozilla.org/en-US/firefox/new/
Before starting the Deeper Chain bridge tutorial make sure you download one of the above browsers on your computer, install a Metamask wallet extension and configure your network to BSC on your MetaMask wallet.
Metamask Wallet Extension Installation:
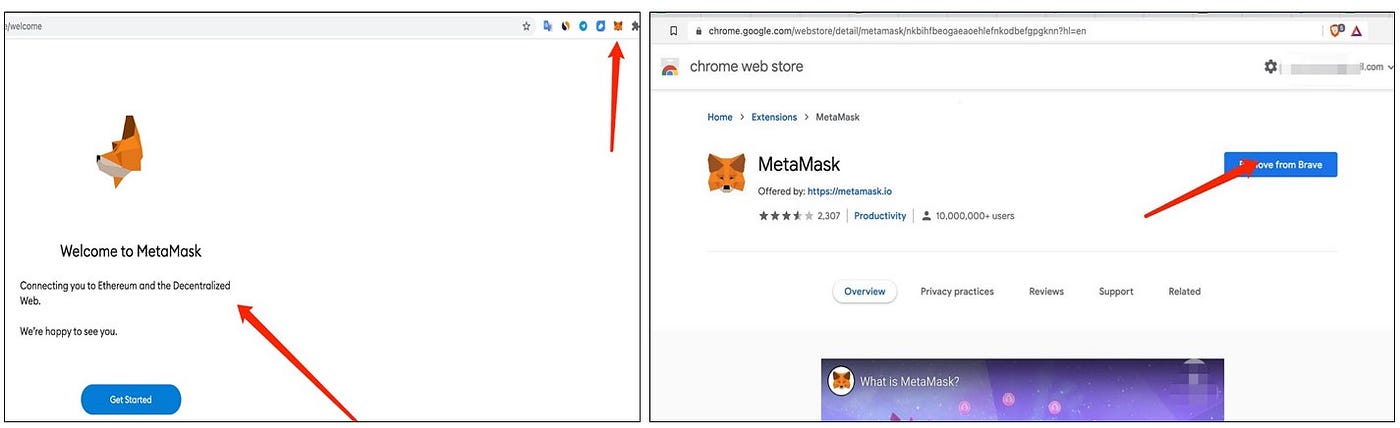
- Go to https://metamask.io/
- Click “Download now” and select “Chrome” → “Install Metamask for Chrome” → “Chrome.” The page will take you to a new Chrome page.

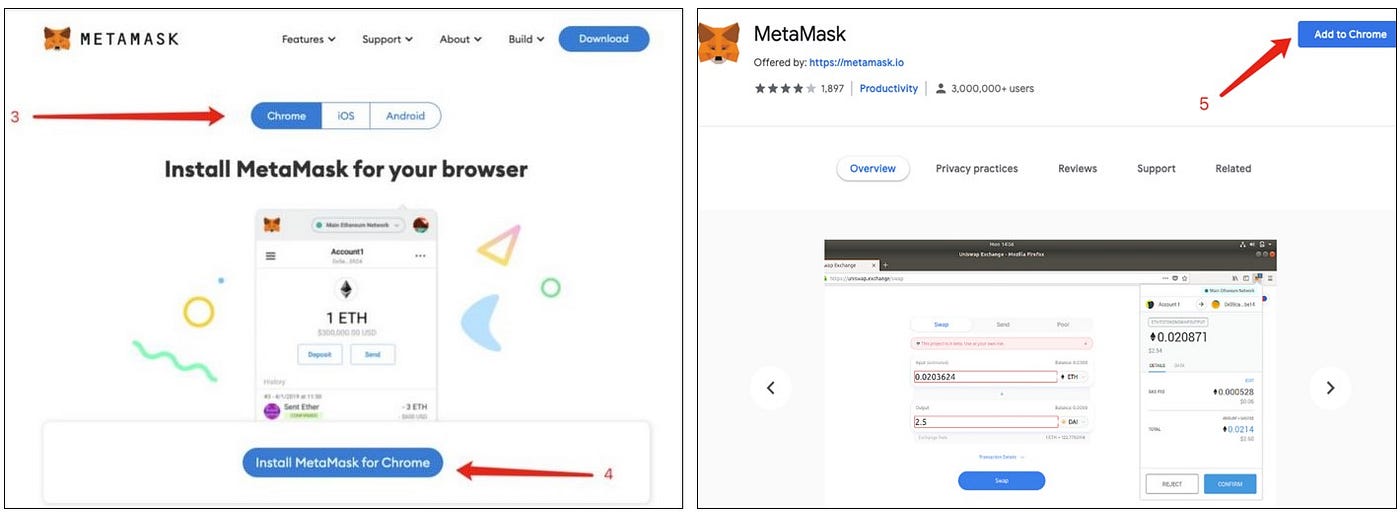
Click “Add extension” on the pop-up page. It’ll take Metamask a few minutes to install on your Chrome browser. Once the installation is complete, you will be able to see the MetaMask fox logo on the top right of your Chrome browser.

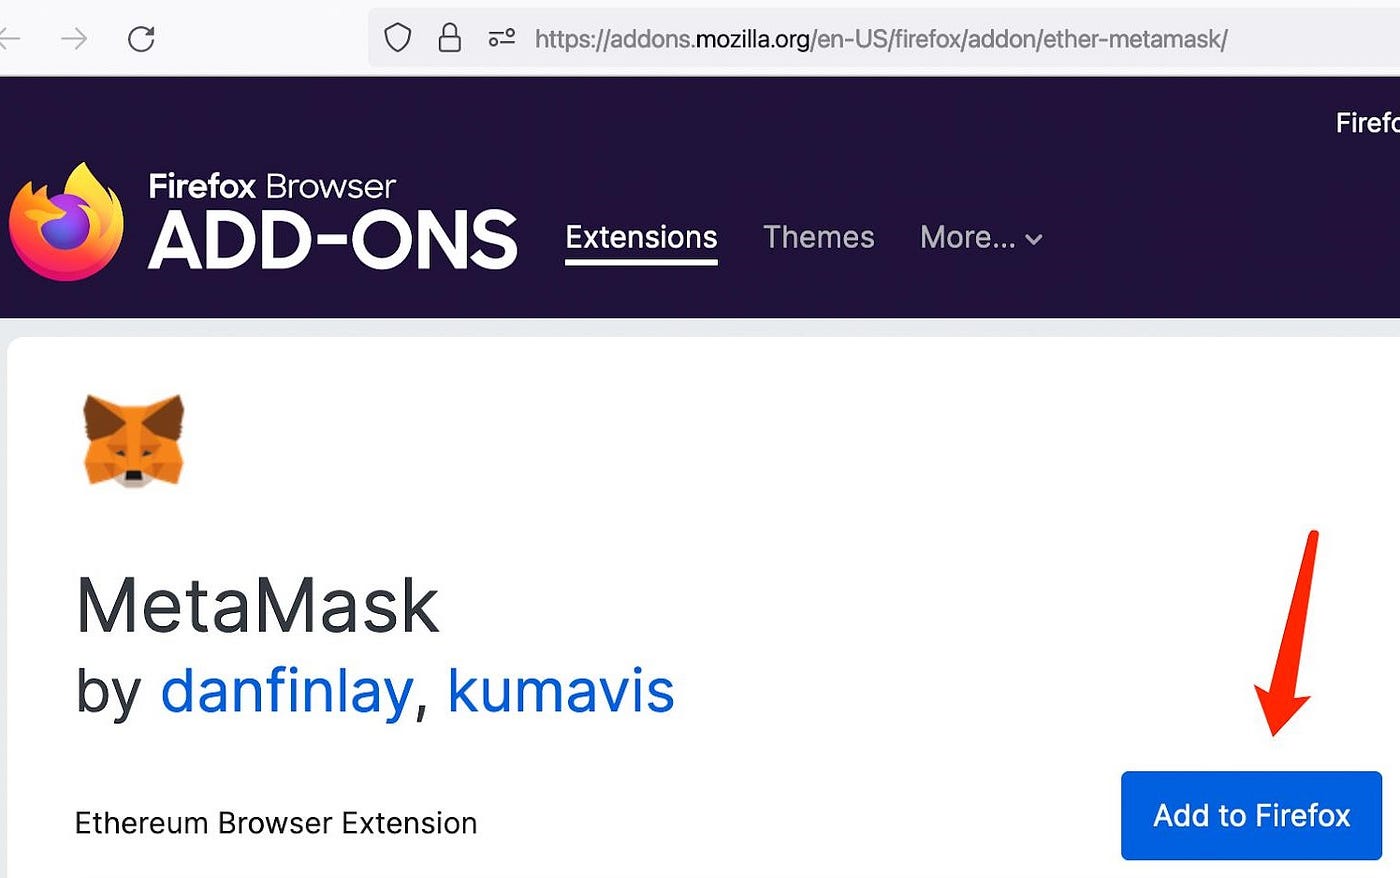
- Firefox browser uses Firefox ADD-ONS page to install MetaMask Extension https://addons.mozilla.org/en-US/firefox/search/?q=MetaMask
- Click “Add to Firefox” on the pop-up page. It’ll take a few minutes for MetaMask to install on the Firefox browser.
- Once the installation has been completed, you will be able to see the MetaMask fox logo on the top right of your Firefox browser.
Configuring the BSC Network in your MetaMask wallet:
- In order to stake using the Binance Smart Chain, users have to configure their MetaMask wallet to include the BSC Mainnet (BEP20) in order to stake using Binance Smart Chain.
- Please follow closely the steps in the link below to complete your configuration: https://docs.binance.org/smart-chain/wallet/metamask.html
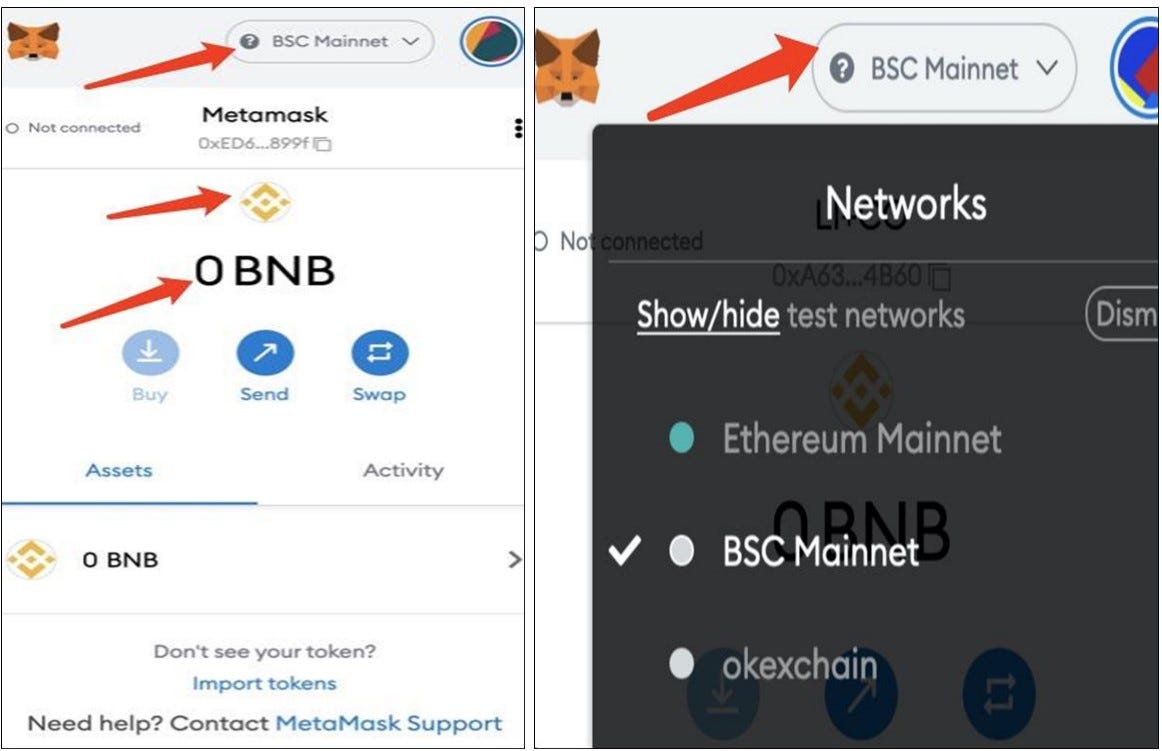
- Once the configuration has been completed, you will see “BSC Mainnet” at the top of the wallet, Binance’s yellow logo, and a balance of “0 BNB” as shown in the picture below.
- If you use the same wallet for both Ethereum and BSC networks, simply click on the dropdown menu to switch networks from the Ethereum Mainnet to BSC Mainnet, as shown in the picture below:
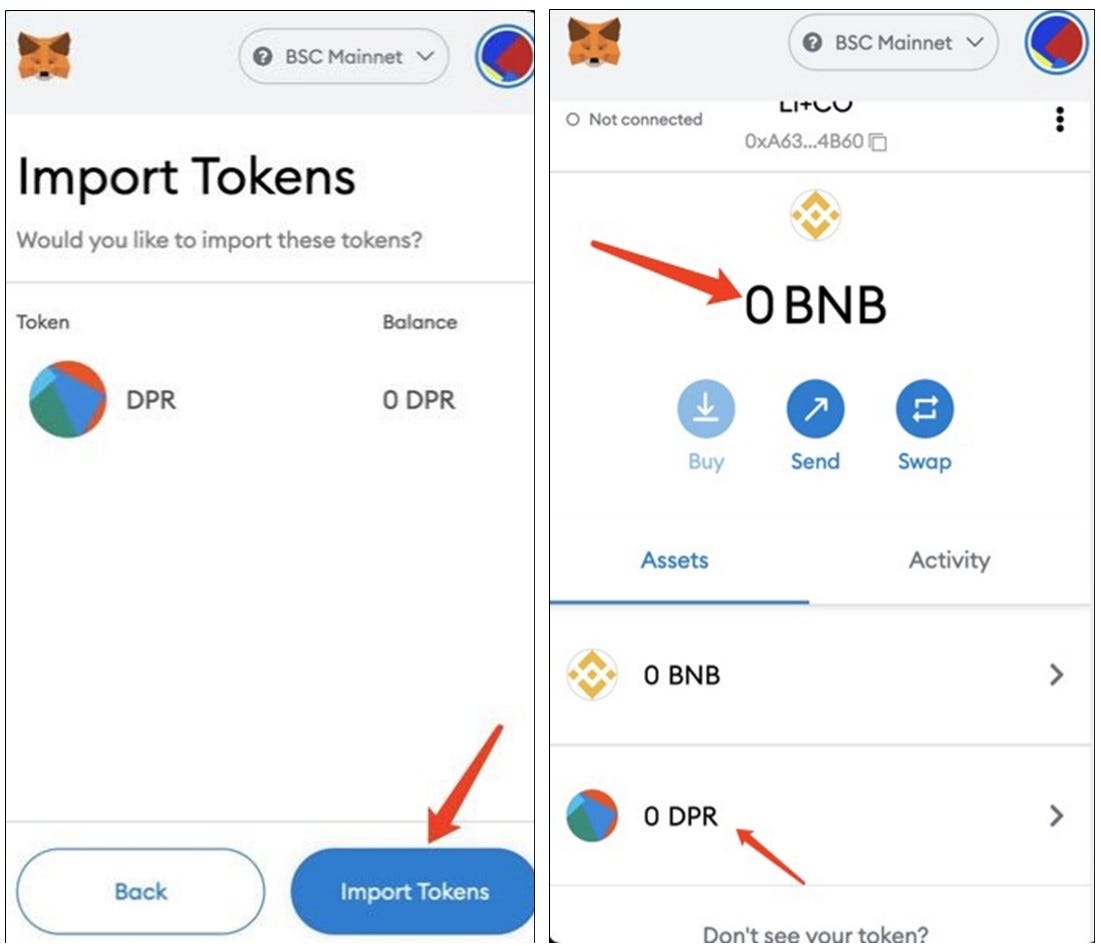
- Click on “Import tokens,” copy & paste our BEP20 contract address “0xa0a2ee912caf7921eaabc866c6ef6fec8f7e90a4” into the “Token Contract Address” box. The DPR token symbol “DPR” and an “18” decimal places number will automatically be displayed once imported. Click on the “Add Custom Token” blue button as shown below:

- As BNB is the gas used on the Binance Smart Chain, please make sure to always keep some BNB tokens in your BEP20 wallet to allow you to make transactions.

Part II -Polkadot JS extension installation
Polkadot JS Extension Installation and Deeper Chain Wallet Import:
- If Polkadot JS Extension is already installed on your Chrome browser and your Deeper Chain Wallet is bound then you can skip to Part II- The Users’ Guide.
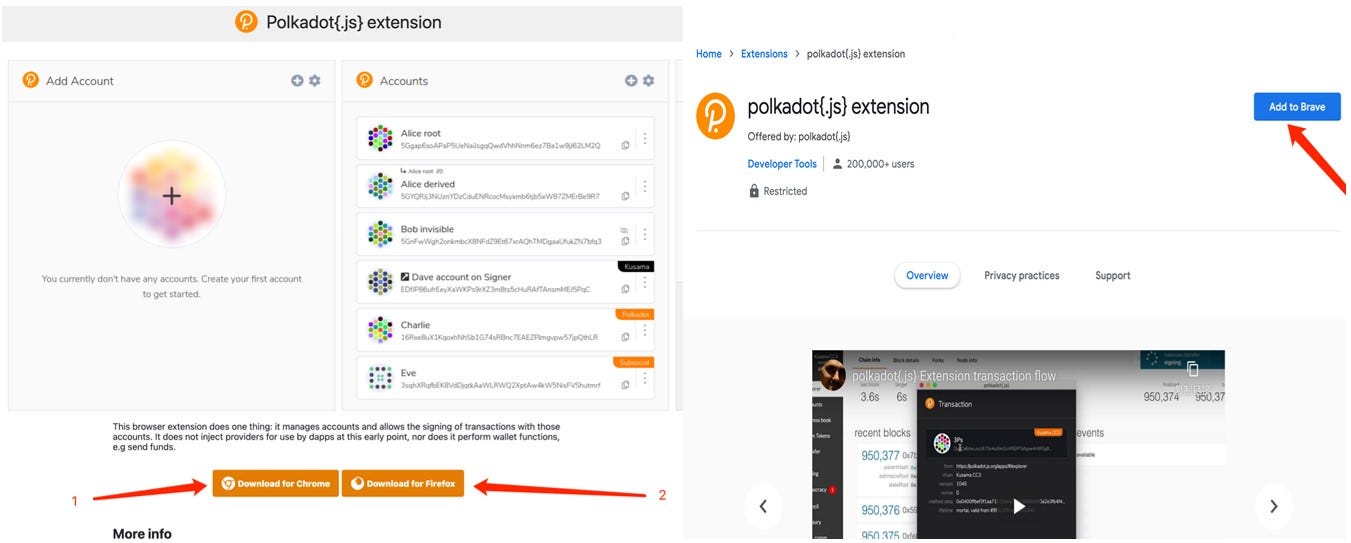
- Please download Polkadot Extension here: https://polkadot.js.org/extension/
- Download the correct Polkadot extension for your browser.
Importing Polkadot {.js} extension to the Deeper Chain Wallet:
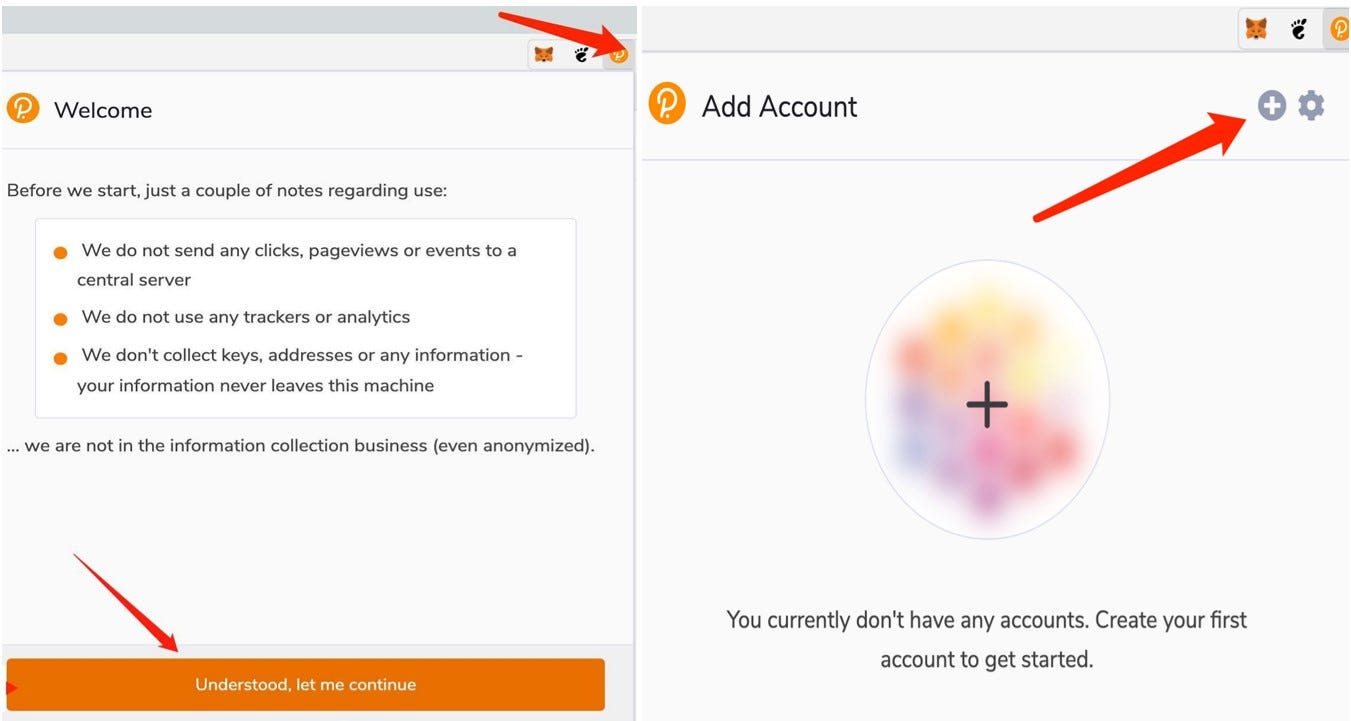
- Click the Polkadot logo on the top right section of your browser then “Understood, let me continue”.
- Then click the “+” symbol to import your Deeper chain wallet.
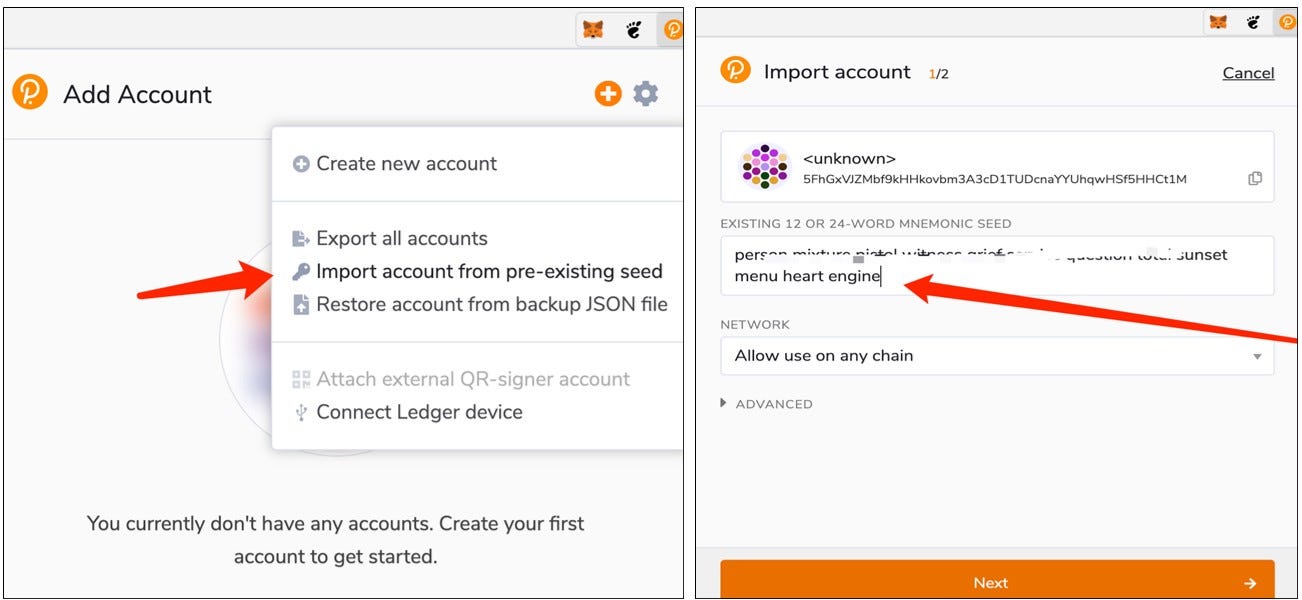
- Click on “Import account from pre-existing seed” to import your Deeper Chain Wallet.
- Please make sure the Deeper Chain wallet address is the same as the device wallet address when entering the mnemonic phrase or private key. Click “Next” after completing this step.
- Create a username and a password for your Deeper chain wallet.

Part III- BSC/BEP20-Deeper Chain Bridge User’s Guide
Step 1: Connecting your MetaMask BEP20 wallet
- Go to the Deeper Chain Bridge link: https://deeperchain-ethereum-swap.deeper.network/swap
- If you have not installed the Polkadot extension a reminder pop up windows will be displayed when you open the page. Please click on “Confirm”, log in to your MetaMask, and connect your Metamask wallet to our bridge platform. Please make sure your MetaMask network is on the Binance Smart Chain (BSC), then click the “Sign” button for Signature Request.

- Once you have successfully connected your wallet to the Deeper bridge platform, it will show “Connected” next to the green dot on the top left of your MetaMask wallet page.
- Please make sure the BEP20 wallet you connect with is the one where you would like to receive $DPR in.
- Please also make sure you have enough BNB as gas fees. You will be paying 2 different gas fees: approval and transaction.
- Please pay attention to the following numbered items after connecting your MetaMask wallet.
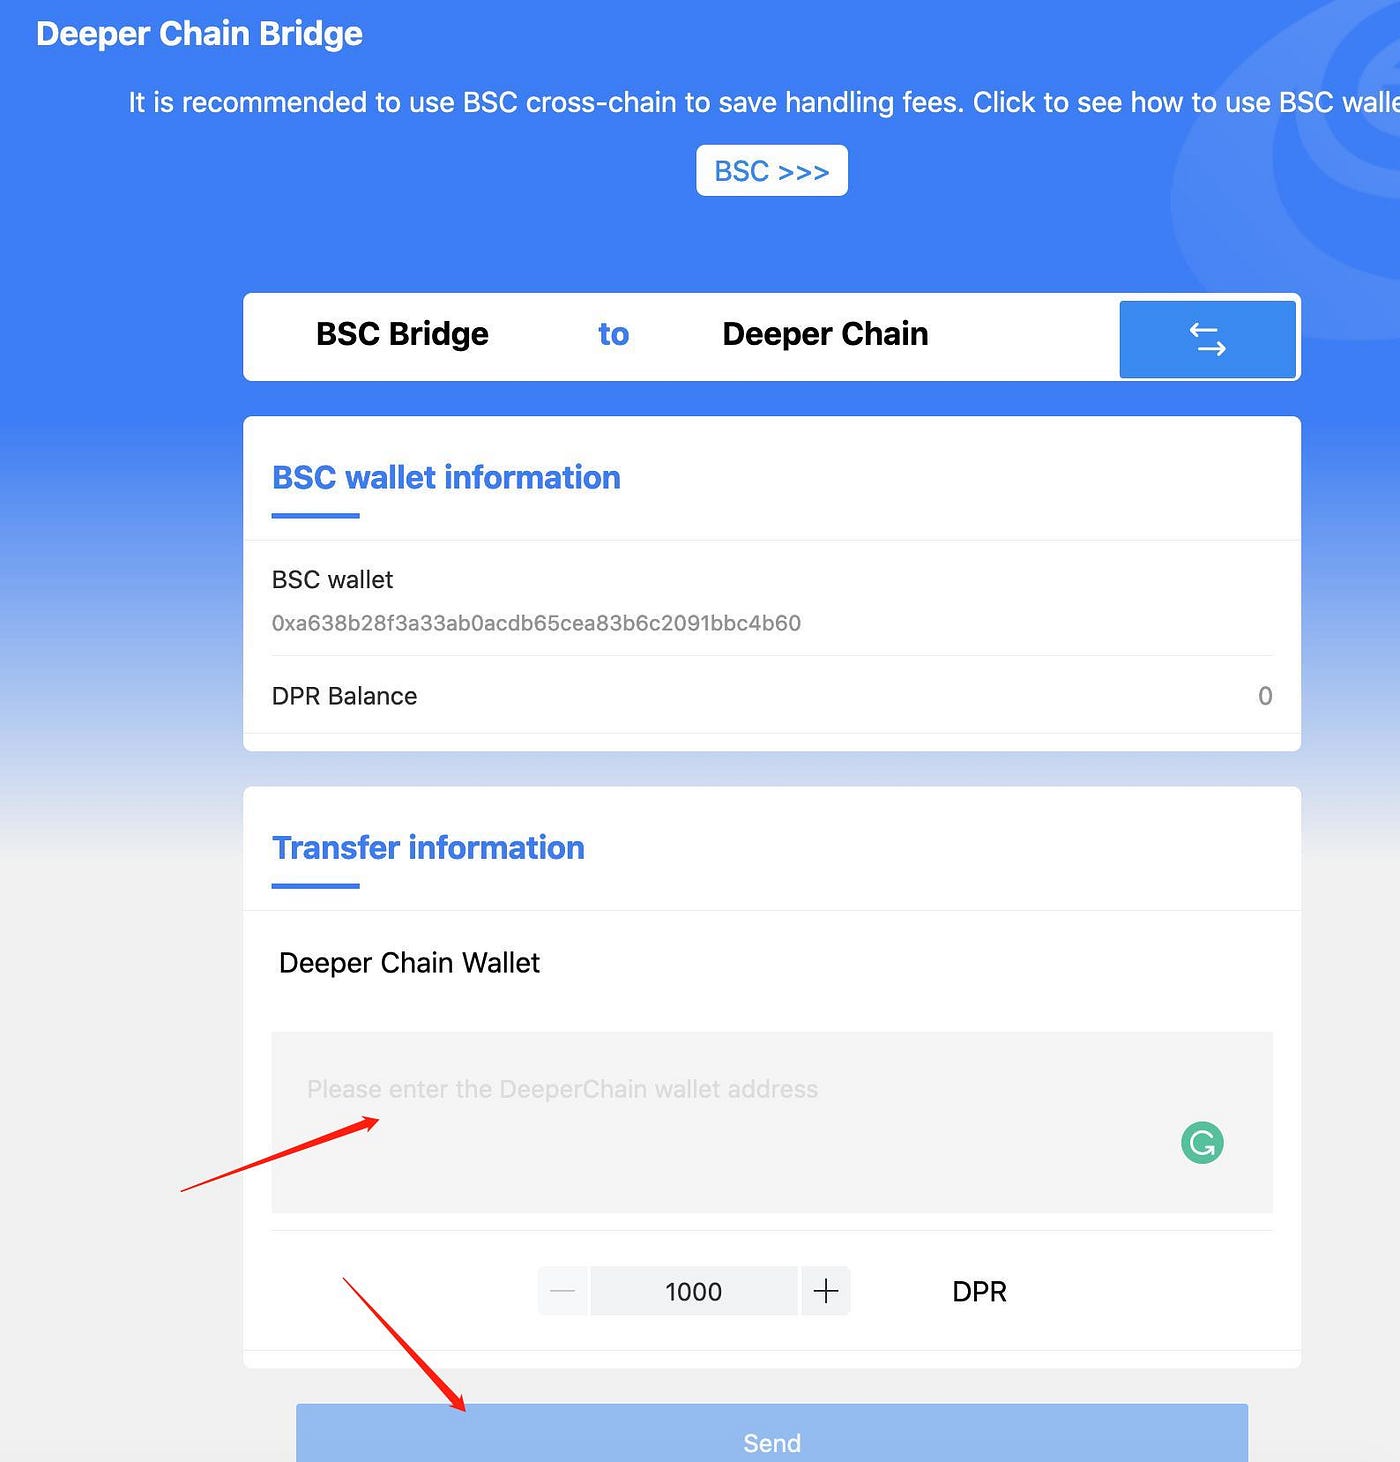
Step 2: Swapping BEP20 wallet → Deeper Chain wallet: Transferring $DPR from your BEP20 wallet to the Deeper Chain wallet.
- By default, you can swap $DPR from your BEP20 wallet to your Deeper Chain wallet by entering your Deeper Chain wallet address into the input box, choosing the amount of $DPR, and then clicking the “Send” button.
- By clicking the “Send” button, a Polkadot “Authorize” window will pop up. Please click the orange “Yes, allow this application access” button to complete the swapping process.


-
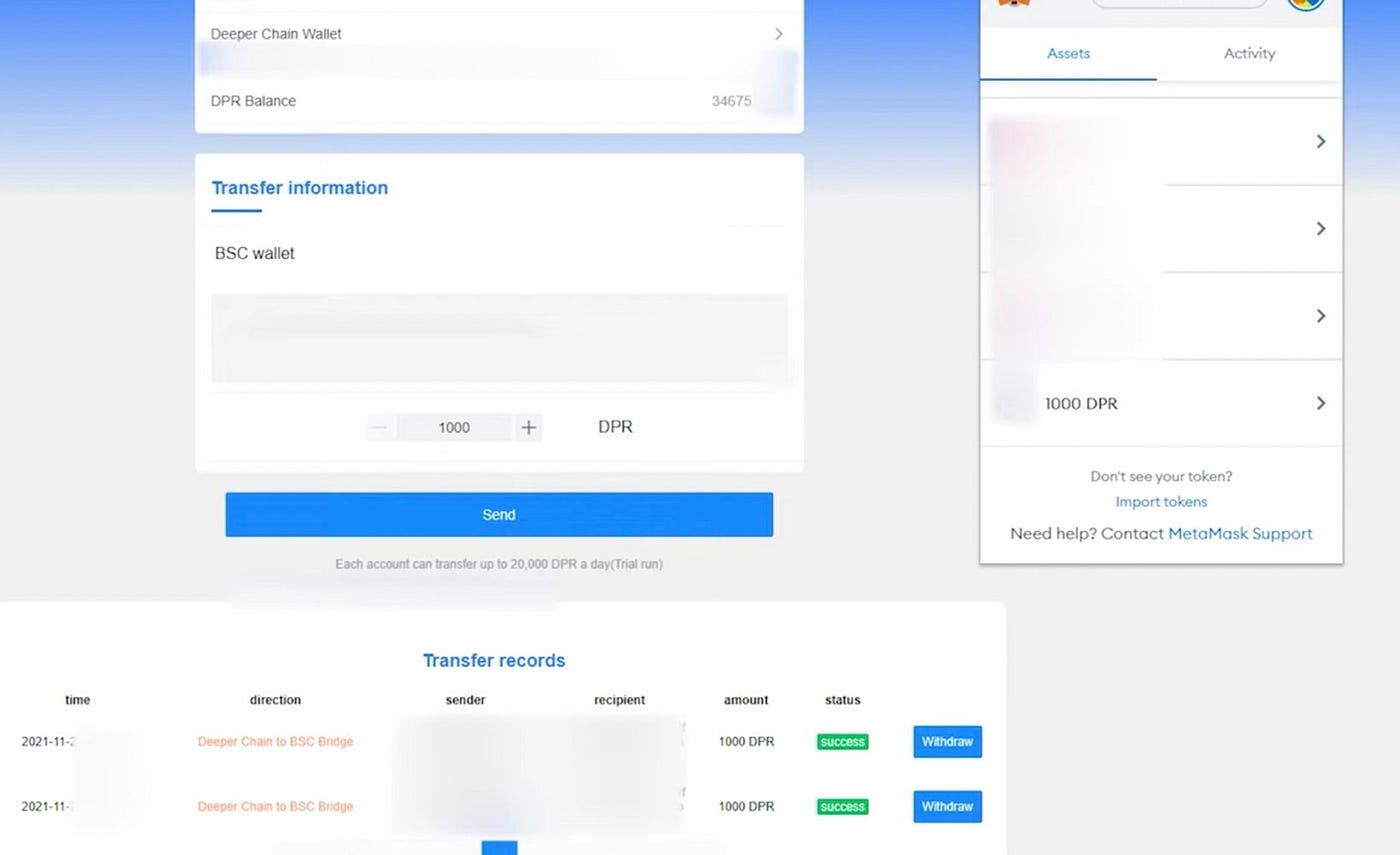
Deeper Chain wallet→ BEP20 wallet: transferring/withdrawing $DPR from your Deeper Chain wallet to your BEP20 wallet.
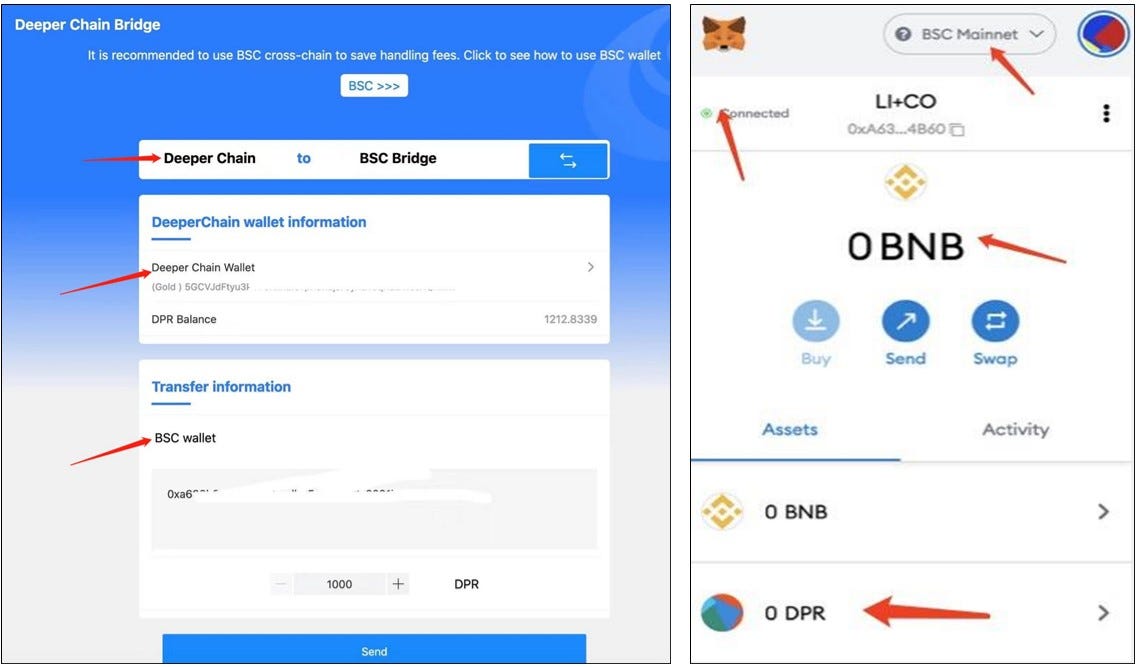
- Make sure to click the switch arrow button to switch from Deeper Chain to Binance Smart Chain Bridge at the top of the window.
- Connect your Deeper Chain wallet to see your Deeper Chain wallet balance. Then input your BEP20 wallet address and the $DPR amount you’d like to transfer and click the “ Send” button like in the picture below.
- Please note- the minimum withdrawal amount is 1000 DPR, the maximum withdrawal amount is 3,000 DPR per day per person.
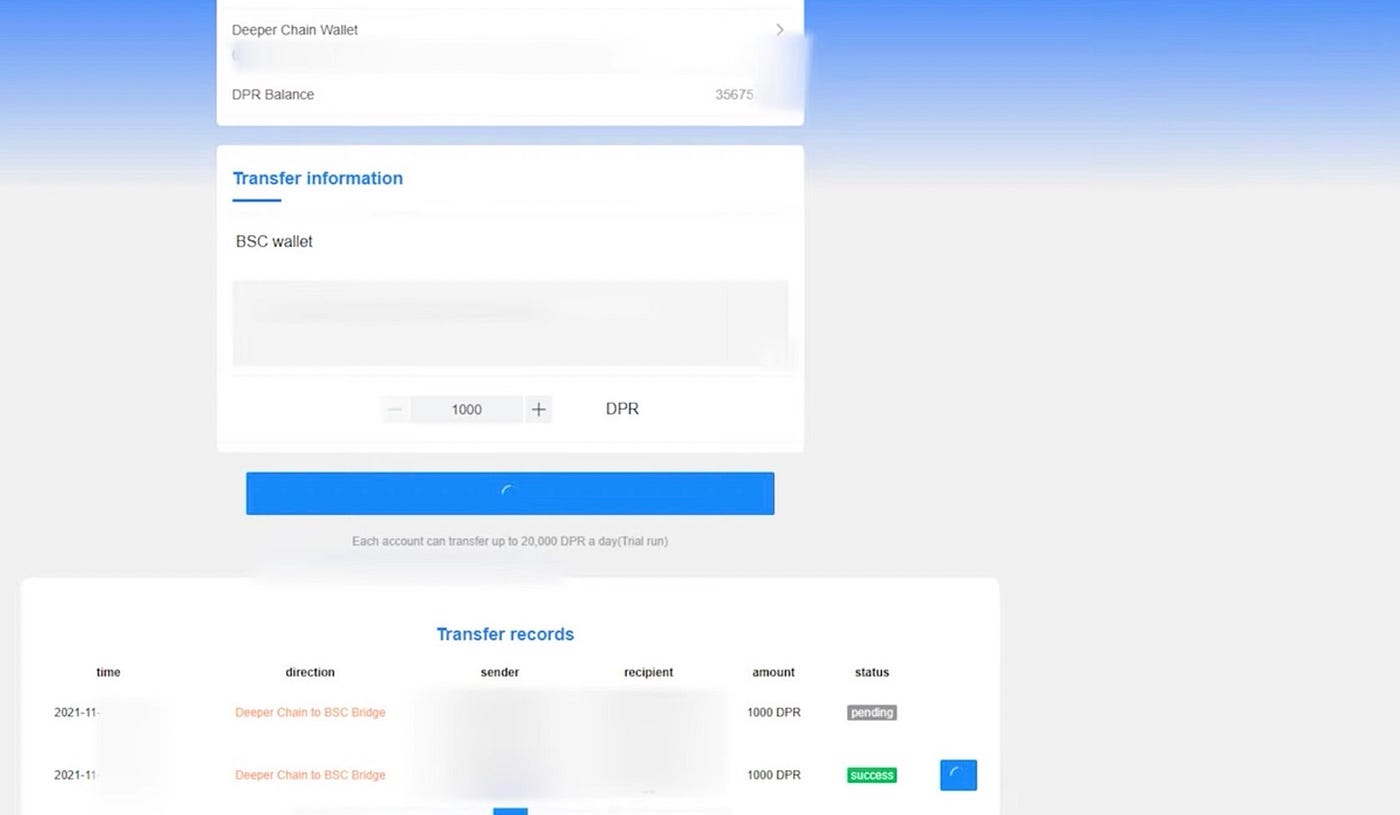
- Input your Polkadot password and click the orange “Sign the message” button as shown below.

-Next, a Metamask wallet window will pop up with the gas fee. Click the “Confirm” button to enter Binance Smart Chain and then you will see the transaction record under the bottom of the bridge site.

-Click the “Withdraw” button on the right side of the transaction record, and click the “Confirm” button again to complete the swap.
-Once DPR is transferred to your BEP20 wallet, you can trade it directly at Pancakeswap or transfer it to an exchange such as Gate.io or Kucoin which supports DPR (BEP20).
Note: this swap requires users to input the Polkadot wallet’s password they created when importing the Deeper Chain wallet. If users forget their password, they can re-import the Deeper Chain wallet’s 12-word seed phrase to set up a new password.